Optimizing your Gameplay - From Clears to Clicks
Lottos are approaching - Optimize your gameplay for better farming

Article written in collaboration with Kozakura who streams regularly at twitch.tv/kozakura - check him out!
What does it mean to optimize gameplay? For some players, it could be as simple as bringing class advantage to a battle while, for others, the answer could be much more technical in nature. The purpose of this article is to break down the different levels at which one can optimize gameplay - for both the f2p and the whale.
This article will use terms and abbreviations unique to FGO, the definitions of which can be found here:

At the time of this article's publication, the global FGO server is a few weeks away from one of the year's most anticipated events - Gilfest. Many players will be looking to invest time and resources into developing team compositions to farm the lotto nodes as efficiently as possible. This article will use some Gilfest team compositions to illustrate specific points, the hope being that players will be able to improve their own teams by applying the various optimization methods in this article.

Table of Contents
| Section | Subsections |
|---|---|
| Metrics | |
| Common Sources of Clicks / Time | |
| Optimizations for Everyone | Case Study - Nerofest, Nitocris |
| Low resource (no Superscope) | Gilfest - Paracelsus and Sieg |
| 1 Superscope | XSS, Gilfest - no XSS comps |
| 2+ Superscopes | |
| Final Thoughts |
Metrics
So what can the "efficiency" of a team composition be measured by?
Time: The amount of actual time spent clearing a node.
Slots: How many slots can be dedicated to event CEs (for event bonuses) or CEs that provide other bonuses such as the ones from the MP shop (Chaldea Lunchtime, Personal Lesson, and Personal Training, among others).
Effort: How much effort and attention is required on the part of the player in order for the run to go smoothly - how streamlined is the setup?
The value of looking at these metrics is that one can determine when to make tradeoffs between them, depending on their priorities. For example, a player may prefer teams that are more time efficient in exchange for being less slot efficient while others may prefer high effort teams that take a while to clear a node but allow for the use of all 6 slots for non-farming CEs.
With this in mind, we can look at different ways in which we can improve the efficiency of our teams.
As a point of reference, let's list common sources of clicks and time:
Common sources of clicks / time:
| Source | Clicks / Time |
|---|---|
| Plugsuit swap | 5 clicks + swap time |
| Waver | 4 clicks for all skills |
| Skadi | 5 clicks for all skills |
| Arash | 1 click for battery + death animation / swap time |
| Other Mystic Codes | 2 clicks minimum per skill (open MC + select skill) |
| 3 wave node | 12 clicks minimum - a turn will always have minimum of 4 clicks (attack button + select 3 cards) |
The number of clicks required for any given setup is important as it greatly contributes to the time and effort required for clearing a node - both of which are important to minimize when farming for long periods of time, such as in lottos. On that note, we look at different ways players can optimize their setups, depending on the resources available to them.
Optimizations for everyone
- Avoid using the click / time sources above, especially plugsuit, Waver, and Arash. Although these are all staples of team building for lower resource players, it is recommended to move away from them when possible, as they all significantly contribute to the time and effort required to clear a node. Using Arash also means losing out on a slot that could be used for event or MP shop CEs. Even Skadi, and the XSS system by extension, is not the preferred method of farming in many scenarios - this will be elaborated upon.
- If your team has two buffers for one DPS in the frontline, keep the DPS in the middle to make it easier to buff them. For players who use one finger, having the DPS in either the left or right spot in the frontline means they need to stretch their finger twice as far in one direction in order to apply buffs from both buffers to the DPS. This does not apply to players who use two fingers.
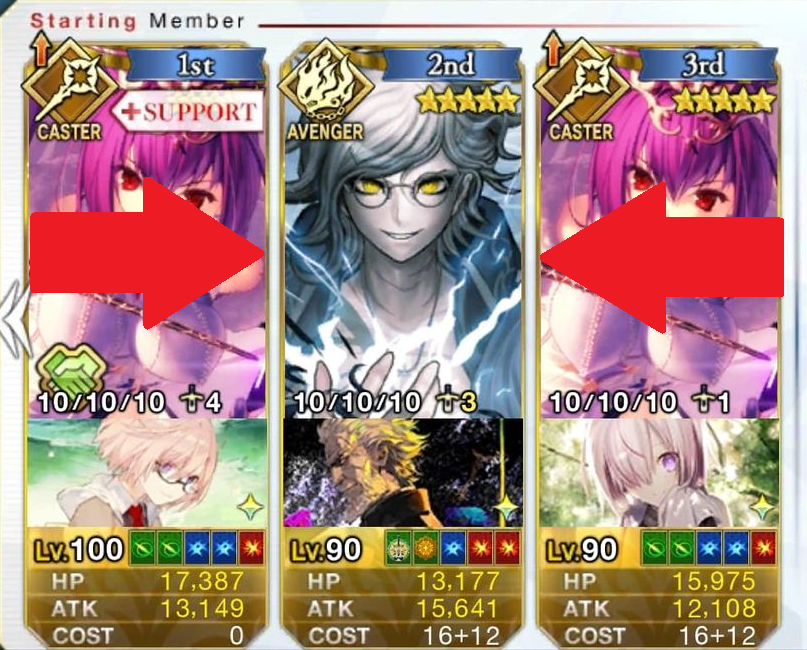
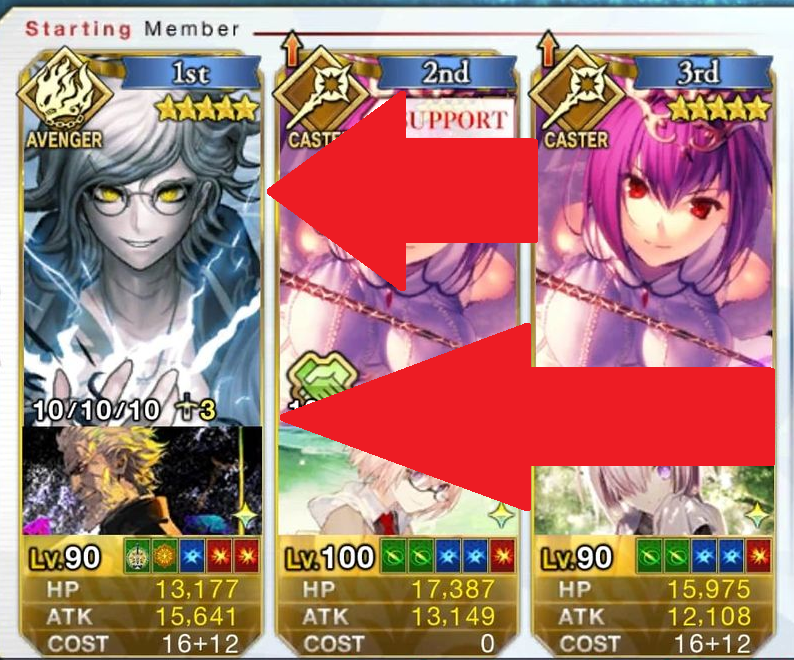
- When using Waver, keep him to the right of the servant receiving the 30% NP charge from his first skill. This means your finger travels the least possible distance for the buff to be applied. This applies to not just Waver, but all targeted buffs.

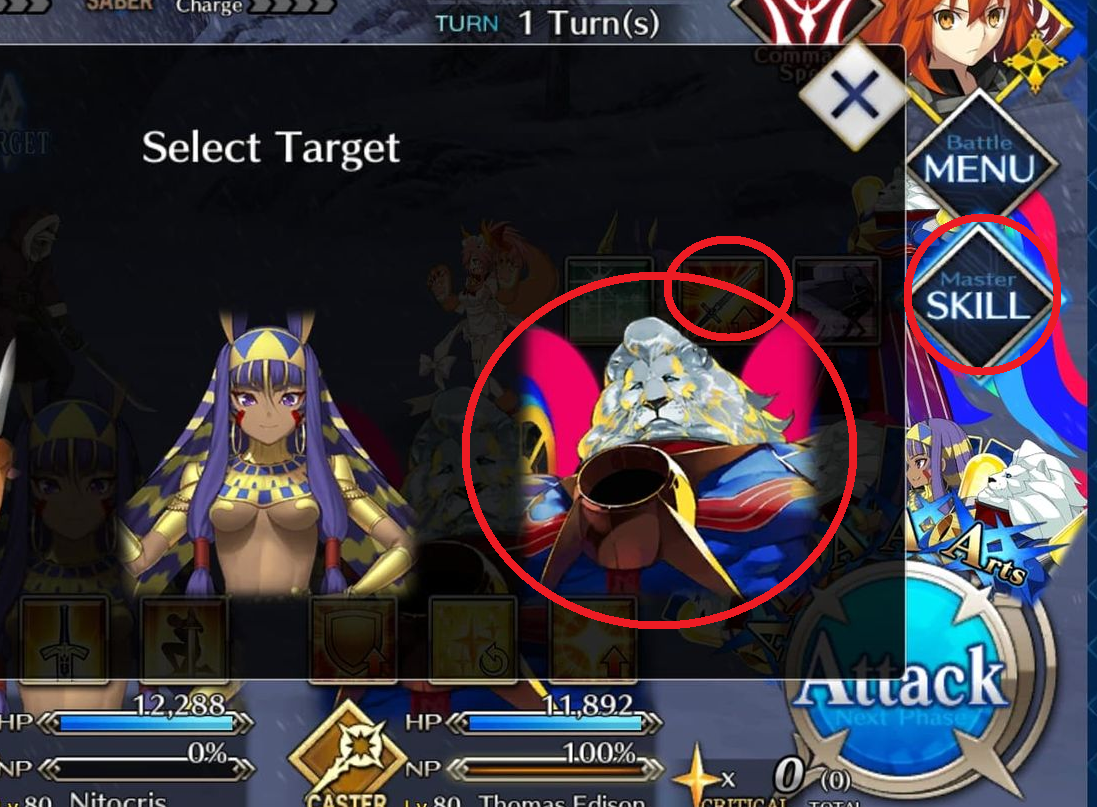
- If a targetable Mystic Code skill is being used on a servant, keep the servant as far right as possible in order to minimize the distance your finger has to travel from the MC to the servant.
- Use servants with faster NP animations (Kiara has a 50% battery - good for farming, but her NP is the longest in the game). This one is dependent on whether or not time efficiency is important to you - this will be elaborated upon later on.
- Try to avoid using targeted buffs if teamwide buffs are an option. Targeted buffs require 2 clicks, as a target needs to be selected after the skill is used. Teamwide buffs instantly apply to the entire party, requiring only 1 click. This also applies to choosing between using MC buffs and teamwide buffs. When possible, use the teamwide buff instead as MC buffs are a minimum of 2 clicks (selecting the MC and selecting the skill).
- Avoid using Mystic Codes or servants that are already max level / bond. For the former, it is worthwhile to adjust your team compositions to work with different MCs, as leveling them boosts the skills that they provide - the exception being the Atlas Mystic Code, which only has its cooldowns reduced. For the latter, a player may choose to use servants that are already max bond if they do not care for bond. But keep in mind that raising bond on other servants gives extra apples and SQ, making it a worthwhile endeavor.
- Sometimes it might be better to not use buffs (save clicks) if a wave can consistently be cleared by facecards. This one is dependent on how much attention the player is willing to put into the run - it takes effort to pick out which facecards would be ideal for finishing off the wave. Players who want every run to be consistent while not paying attention should choose to fully buff in order to avoid the risk of facecards not clearing the wave.
- Use servants who have higher base damage so that they can avoid self buffing. This one depends on if the player prioritizes having a lower effort run over saving bond on servants who might do more damage than others when buffed.
- Avoid making chains - Buster / Quick / Arts / Brave, as the chain indicator takes up time while the extra attack in a brave chain can extend the duration of the turn.

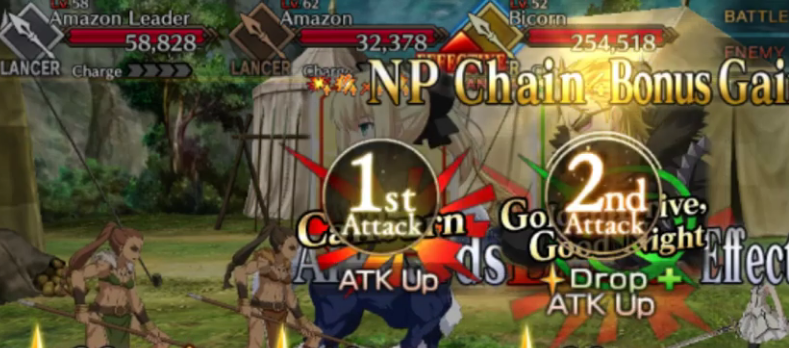
- When pairing an AoE NP with an ST NP for a wave with a high HP mob and other weaker mobs, try to select the AoE NP before the ST NP. This obviously doesn't apply if the AoE NP has an OC effect that needs to be boosted in order to kill the wave. Doing this allows you to avoid 1 click, as the high HP mob does not need to be selected before using the NPs.
- When using plugsuit, keep the servant being swapped out on the right in the frontline, and the servant being swapped in on the left in the backline. This allows you to quickly select the two of them in the plugsuit swap screen with minimum distance traveled by your finger.
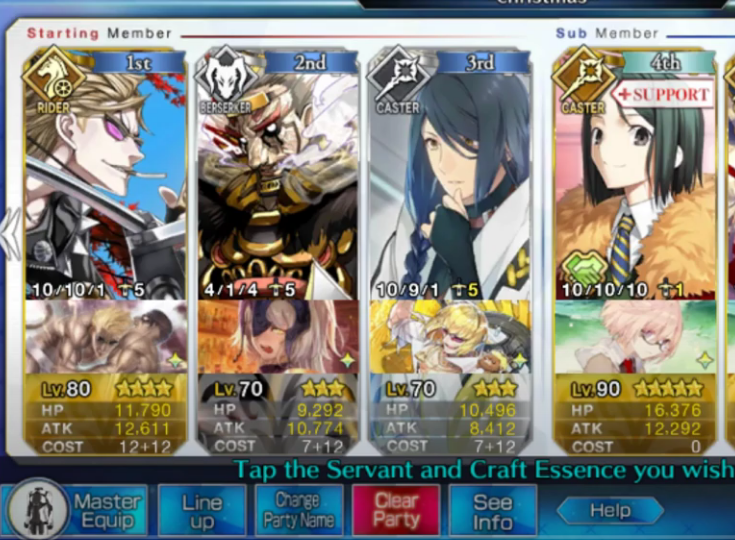

To illustrate the effectiveness of some of the aforementioned points, we examine a farming setup that was used in a previous lotto event, Nerofest 2019.
Case Study: Nerofest 2019, Rotation 3 (Finals)
Source: Nerofest 2019 3-Turn Setups Analysis by SaberofAvalon
Nerofest 2019, much like the upcoming Gilfest, was divided into 3 rounds. The final round was known for being easily loopable by Mordred (Rider) in various teams utilizing servants such as Waver, Tamamo-no-Mae, Helena Blavatsky, and Nero Claudius (Bride).
One such setup, shown below, utilized Mordred, Waver, Tamamo, and Helena with the plugsuit NP to fully buff Mordred on turn 1 and have her refund 100% on both waves 1 and 2 in order to "surf" all 3 waves. This setup not only achieved maximum slot efficiency (6 slots), but it was also very streamlined, as Mordred did not require any additional buffs or NP charge after wave 1.

Given all the listed optimization methods, the following variants were the objectively best formations in which to construct this particular setup:
Tamamo's targetable arts buff is her third skill, so it makes sense to have her to the left of Mordred for easy application. As Mordred is also receiving Waver's targetable first skill, she is placed to his left. Because Helena's location does not matter (both her NP battery and rainbow buff are teamwide), we can plugsuit either her or waver in and out from the right side of the formation.
Although such seemingly minor optimizations might not have greatly benefited players who farmed the lotto casually, the increase in efficiency and comfort was greatly felt by heavy farmers who ran such nodes extensively for the duration of the event.
- Nitocris (Accessible with the SR ticket given from certain download campaigns)
Nitocris
The last point requires some explanation, as Nitocris' ability to improve a player's quality of life may not be immediately apparent. Some of her obvious benefits are:
- Despite having relatively low NP damage, she does enough to clear the first two waves of some free quests relatively easily, even when doing neutral damage. This is especially true if Nitocris is at least NP2.
- Can NP immediately with her 100% NP charge (second skill at level 8), meaning she can hold any CE. (Black grail for damage, event CEs for bonus, MP shop CEs, etc.) This makes her extremely slot efficient.
- Can NP twice if she receives NP charge from her CE / other buffers. This also contributes to her slot efficiency. For example, a frontline of Nitocris, support Waver, and a third servant could clear an entire 3 wave node just by themselves. This would leave 4 slots open for event / MP shop CEs (Waver + entire backline). Some setups might even allow for 5 slots if the third servant has a battery of their own.
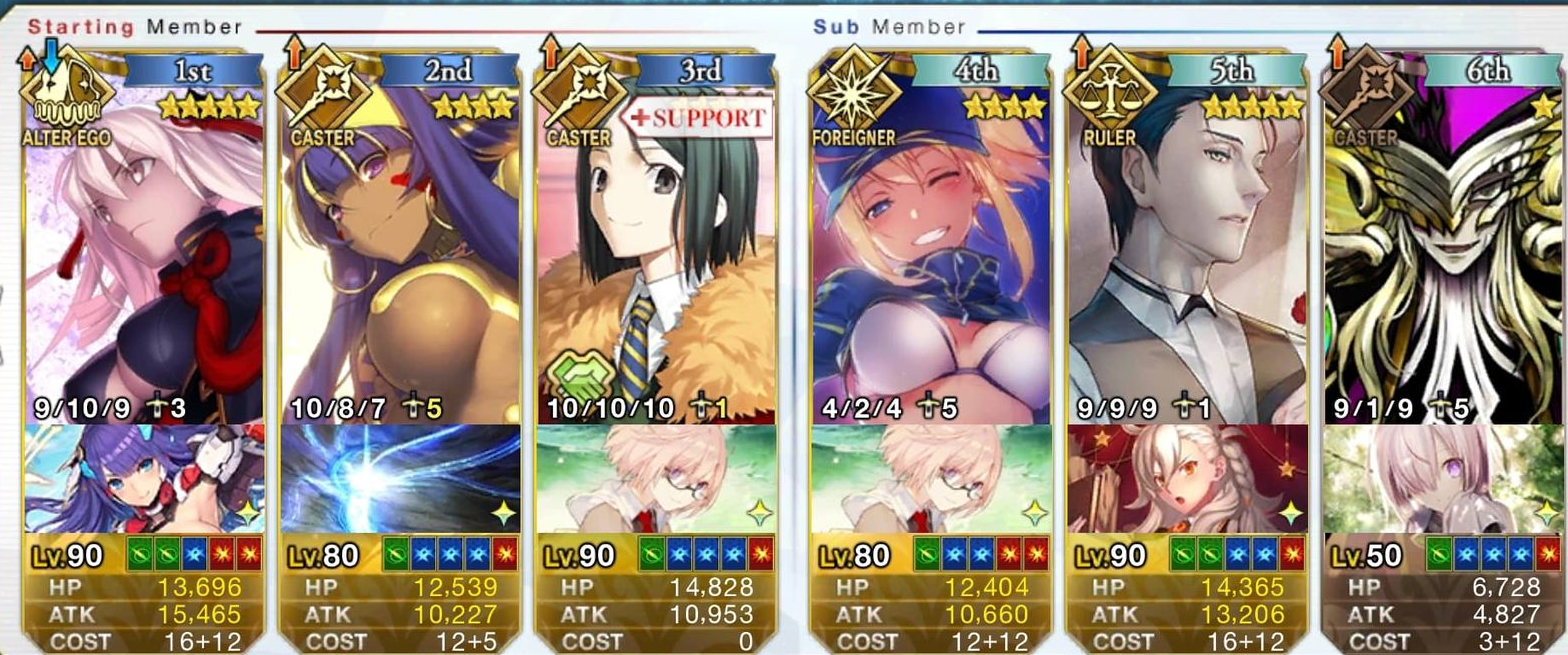
For this sample 4 slot comp:
Turn 1: Waver uses all skills, first skill goes to Nitocris. Nitocris NPs.
Turn 2: Nitocris uses skill 2 and NPs.
Turn 3: Okita Souji (Alter) uses all skills and then uses her NP. (50% from CE + 20% from Waver on turn 1 + 30% battery from skill 2)

For this sample 5 slot comp:
Turn 1: Waver uses all skills, first skill goes to Nitocris. Nitocris NPs.
Turn 2: Nitocris uses skill 2 and NPs.
Turn 3: Paracelsus uses skill 1, skill 2, then uses his NP. (0% from CE + 20% from Waver on turn 1 + 80% battery from skill 1)
However, many players undervalue Nitocris despite her 100% NP battery due to her low damage and the unreliability of the instant death mechanic. However, Nitocris can be utilized not only for waves of assassin and berserker mobs, but also for many free quests where there are high HP bronze / silver mobs.
Nodes with high HP bronze / silver mobs on wave 3 can actually be reliably killed by pairing Nitocris with either Edison or Void Shiki. Nitocris can be holding any CE if the wave consists of bronze mobs, but needs to be holding Devilish Bodhisattva if there are silver mobs.
If Nitocris' first skill is maxed, her NP will guarantee an instant kill on bronze mobs if she also receives an OC boost from Edison's third skill, Concept Improvement, which increases the chance of her NP applying instant death. This also works with Shiki's first skill, which decreases death resistance for all enemies, guaranteeing that Nitocris' NP will apply instant death. However, Shiki's Mystic Eyes of Death Perception does need to be at least level 5 if being used on silver mobs, unlike Edison's Concept Improvement.
The benefit of using Shiki over Edison here is that Edison's skill is targeted, requiring 2 clicks, while Shiki's skill applies to all mobs, requiring just 1 click.
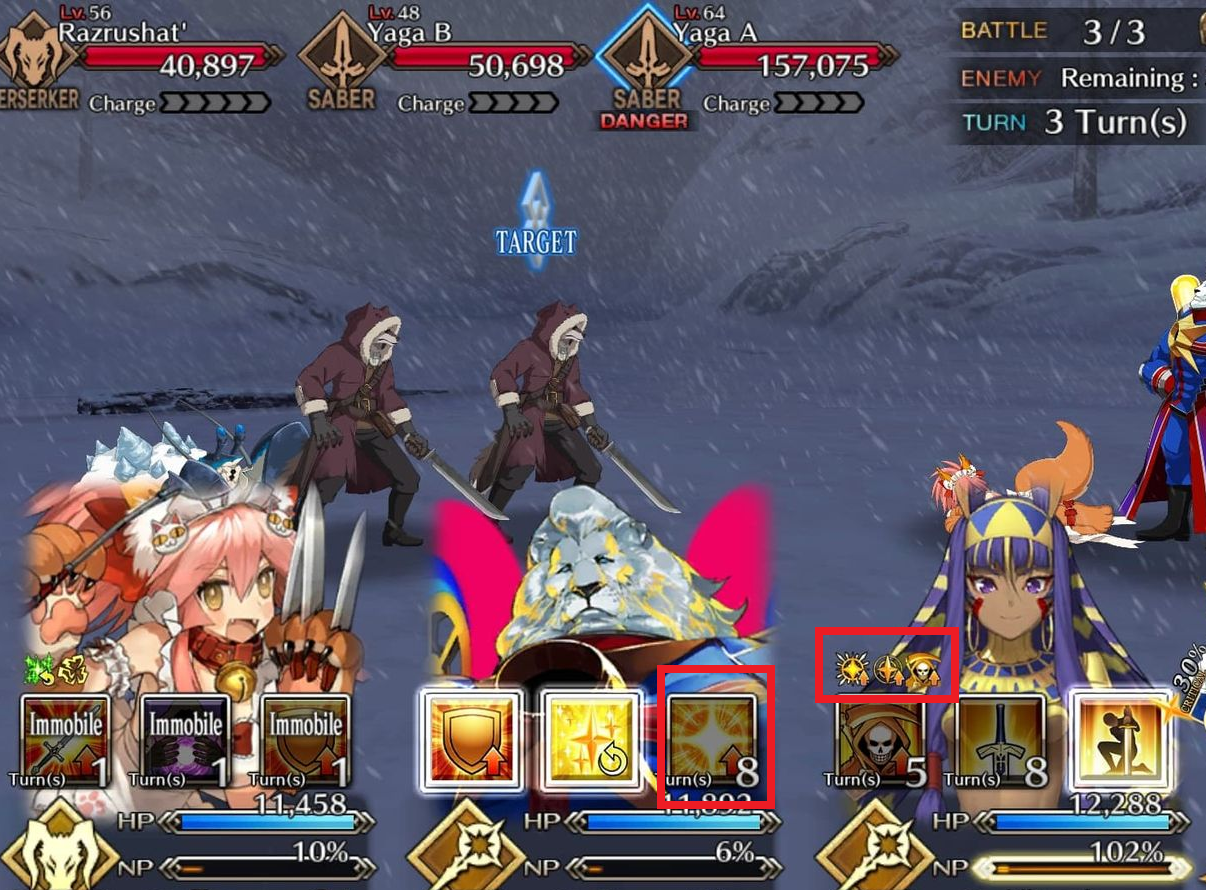
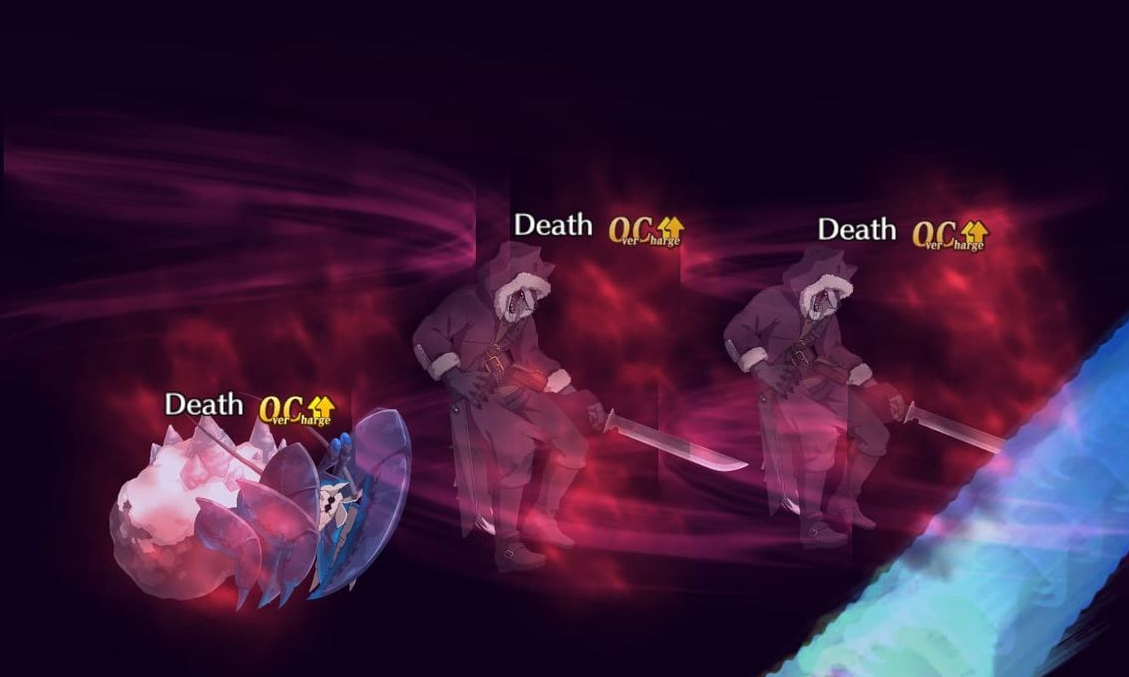
Nitocris teams that rely on instant death for the third wave are actually quite practical, as there are many free quests that satisfy the conditions of the first two waves being low HP with the third wave having a high HP mob. The first two waves need to be low HP in order for either Shiki or Edison to clear one of them using just their NPs. Any AoE servant can be brought in to clear the other wave, although it is preferable that they have a team buff of some kind in order to boost the relatively low NP damages of Edison and Shiki (assuming NP1 each). This issue can also be rectified through the use of MC skills.
The following is a list of free quests that players may find themselves farming for materials. These FQs can be cleared using the aforementioned Nitocris teams. This list is not extensive. There are other FQs which can be cleared using Nitocris in different setups.
- Mystic Gunpowder - Yaga Smolensk
- Mystic Gunpower + Shell of Reminiscence - Burned Village
- Eternal Ice - Yaga Moscow
- Eternal Ice + Shell of Reminiscence - Crushed Village
- Stake of Wailing Night - Gallows Hill

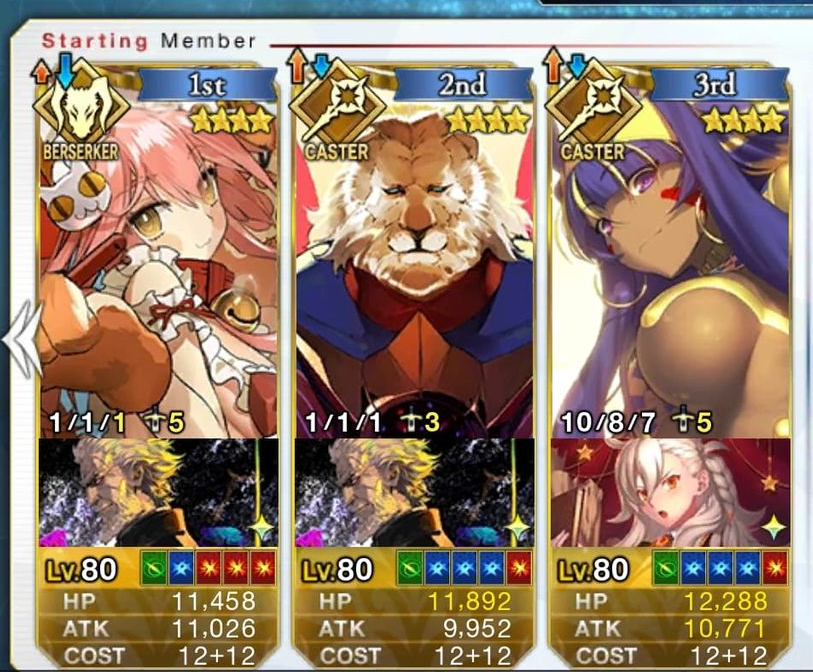
The best part of these instant death Nitocris teams is that Nitocris herself only has to be NP1, as her actual NP damage is not relevant when farming these nodes.
The takeaway here is that Nitocris is an extremely useful servant for both f2ps and whales alike, as she can be acquired either through an SR ticket or through spooks (she is in the permanent pool of servants). And if one already has a copy of Nitocris, Edison is actually an extremely valuable servant to have and make use of.
The following sections are broken down by superscope count, as having one or more superscopes greatly increases the number of team compositions available to a player. However, even possessing one or more regular kaleidoscopes is a huge boon for flexibility in team building. The following sections are just general guidelines and players should not feel confined to any individual category - all optimizations can be applied to any player.
It is important to keep in mind that as efficiency priorities will vary between players, so will the trade-offs (time / slots / effort) they are willing to make when team building.
Low resource (no Superscope)
- It will probably be difficult to avoid using Arash / support Waver / plugsuit to some degree.
- Although it may require some creativity, even f2p players can easily minturn nodes through the use of welfare servants, battery CEs, and low rarity servants. Although Kaleidoscope is the premier battery CE, lower rarity CEs such as Imaginary Element (in the permanent pool of CEs) and Dragon's Meridian (available in the FP gacha) also work as functional alternatives.
- In particular, full attack event CEs that give 50% NP charge are extremely valuable. The most notable ones (as of this writing) are as follows:
| CE | Effect (MLB) | Event (FGO Global) |
|---|---|---|
| Golden Sumo: Boulder Tournament | 50% NP Charge + 15% atk up | Onigashima / Onigashima Rerun |
| Golden Captures the Carp | 50% NP Charge + 20 critical stars | Rashomon / Rashomon Rerun |
| Fondant au Chocolat | 50% NP Charge + 30% damage against Divine enemies | Valentine 2018 Rerun / RP shop |
| Aerial Drive | 50% NP Charge + 10% buster up + 10% NP damage up | Halloween 2019 / Halloween 2019 Rerun |
| Holy Night Supper | 50% NP Charge + 15% critical damage up + 15% NP damage up | Christmas 2018 / Christmas 2018 Rerun |
| Beautiful Dreamer | 50% NP Charge + 10% buster up + 10% NP gen up | Valentine 2021 |
| Heavenly Demon Princess | 50% NP Charge + 20% arts critical damage up + 15% NP damage up | Summer 4 / Summer 4 Rerun |
| Traces of Christmas | 50% NP Charge + 10% quick up + 10% NP gen up | Christmas 2021 |
Note: CEs whose events have already been rerun are not attainable as of this writing.
- Focus on raising low rarity servants with batteries for more streamlined farming teams. They are as follows:
| Servant | Class | NP Type | Battery |
|---|---|---|---|
| Arash | Archer | AoE | 30% |
| Billy the Kid | Archer | ST | 50% |
| Euryale | Archer | ST | 27% |
| Paris | Archer | ST | 20% |
| Spartacus | Berserker | AoE | 30% |
| Paracelsus | Caster | AoE | 80% |
| Avicebron | Caster | AoE | 80% |
| Shakespeare | Caster | AoE | 20% (targetable) |
| Cú Chulainn (Caster) | Caster | AoE | 30% |
| Chen Gong | Caster | AoE | 10% (teamwide) |
| Medea | Caster | ST | 100%+ |
| Christopher Columbus | Rider | AoE | 30% |
| Medusa | Rider | AoE | 20% |
| Romulus | Lancer | AoE | 20% |
| Gareth | Lancer | ST | 20% |
| Jason | Saber | AoE | 20% (teamwide, Argo servants only) |
| Bedivere | Saber | ST | 30% |
These servants can easily be utilized in teams with supports such as Waver and Skadi that offer teamwide NP charge. Their batteries, in combination with the free event CEs listed above, make it extremely easy for them to utilize their NPs in both farming and high difficulty encounters. Paracelsus and Avicebron in particular can be easily integrated into 5 slot comps due to their having 80% batteries that can be topped off with the 20% from Waver's teamwide second and third skills.
For further reading: Low rarity servant priority guide by Aria
- In addition to the aforementioned low rarity servants with batteries, there are a number of notable welfare servants who can be easily utilized in various team compositions due to their having NP batteries of their own. They are as follows:
| Servant | Class | NP Type | Battery | Event (FGO Global) |
|---|---|---|---|---|
| Chloe von Einzbern | Archer | ST | 50% | Prisma Codes / Prisma Codes Rerun |
| Altera the San(ta) | Archer | ST | 20% (targetable) | Christmas 2019 / Christmas 2019 Rerun |
| Ryogi Shiki | Assassin | ST | 30% | Kara no Kyoukai Collab / Kara no Kyoukai Collab Rerun |
| Gray | Assassin | AoE | 20% | Reines Case Files |
| Sakata Kintoki | Rider | ST | 50% | Onigashima / Onigashima Rerun |
| Sakamoto Ryoma | Rider | ST | 10% (teamwide) | Guda 3 / Guda 3 Rerun |
| Jeanne d'Arc (Alter) (Santa Lily) | Lancer | AoE | 20% | Christmas 2018 / Christmas 2018 Rerun |
| Consort Yu | Lancer | ST | 20% (targetable) | Summer 5 |
| Chacha | Berserker | AoE | 10% per turn | Guda 2 / Guda 2 Rerun |
| Jeanne d'Arc (Berserker Alter) | Berserker | ST | 20% | Summer 3 / Summer 3 Rerun |
| Mecha Eli Chan | Alter-Ego | ST | 20% | Halloween 2019, Halloween 2019 Rerun |
| Sieg | Caster | AoE | 30% | Apocrypha / Apocrypha Rerun |
| Katsushika Hokusai (Saber) | Saber | ST | 20% | Summer 4 / Summer 4 Rerun |
Note: Most welfares whose events have been rerun are not attainable as of the time of this writing. However, main interludes have allowed for the return of some events that have already had reruns, including their welfares. As of this writing, Christmas 2019 and CCC have received main interludes.
- By utilizing low rarity servants and welfares with batteries in conjunction with friend supports, usually Waver, it becomes possible for low resource players to minturn the majority of free quests in the game that are farmed for materials, as can be seen in the following playlist:
Hong's f2p farming setups for free quests and dailies
Paracelsus (and Sieg) Go to Gilfest
Of the welfare and low rarity servants listed, Sieg and Paracelsus are of particular interest as many players will be utilizing them in conjunction with double Waver for the upcoming Gilfest lotto. Sieg is capable of NP looping with his NP gen buff, arts buff, and battery while Paracelsus can clear an entire wave on his own with his 80% battery and enable other loopers (Sieg in this case) with his teamwide arts buff and targetable NP gen buff.
The benefit of utilizing this team is that it is slot efficient (5 slots) and relatively accessible for lower resource players - the main requirement is that the player has their own Waver. It also allows players to get away with preparing only one team comp, as this setup can be used for all 3 Gilfest rotations. The downside is that it requires a lot of time and effort due to the presence of Waver, plugsuit, and minor facecard RNG.
Waver (4 clicks) * 2 + Paracelsus (4 clicks) + Sieg (3 clicks) + plugsuit swap (5 clicks) + plugsuit atk buff (2 clicks) + 3 wave node (12 clicks) = 34 clicks in addition to having some facecard RNG and the plugsuit swap delay.
For more complete calculations: Gilfest 2020: Sieg - Para - Skadi / Waver - Waver Comp Calculations by Ratentaisou
While there are other teams that can be used for Gilfest, it is almost impossible to avoid using plugsuit swap if one is limited by resources. It is possible to avoid using it and dramatically cut down on clicks required, but at the cost of adding extreme RNG.

In this sample team, wave 1 is cleared using entirely facecards and wave 3 requires facecards to fully clear. Although this setup might be less clicks and effort than the plugsuit double Waver team, the higher RNG can lead to the run taking more than 3 turns - not something we want to be doing.
But what if one doesn't own Waver? There are indeed compositions that consist entirely of low rarity servants and support Waver/Skadi but the trade-off is that they are high effort and slot inefficient.
This sample team requires only low rarity servants from the player's own roster but at the cost of being only 4 slots and requiring precise skill timings, being 32 clicks, and still having facecard RNG on wave 2.
The purpose of listing these different setups is to illustrate how, although content can be cleared by f2p and low resource players, having any additional resources at all (such as Waver) can make it easier to build teams that take less time, free up more slots, and require less effort.
1 Superscope
- Superscope makes it easy to work around servants with 50% NP batteries for 4 or 5 slot comps when paired with other battery servants equipped with NP charge CEs and Waver / Skadi.
Sample team (4 slot):
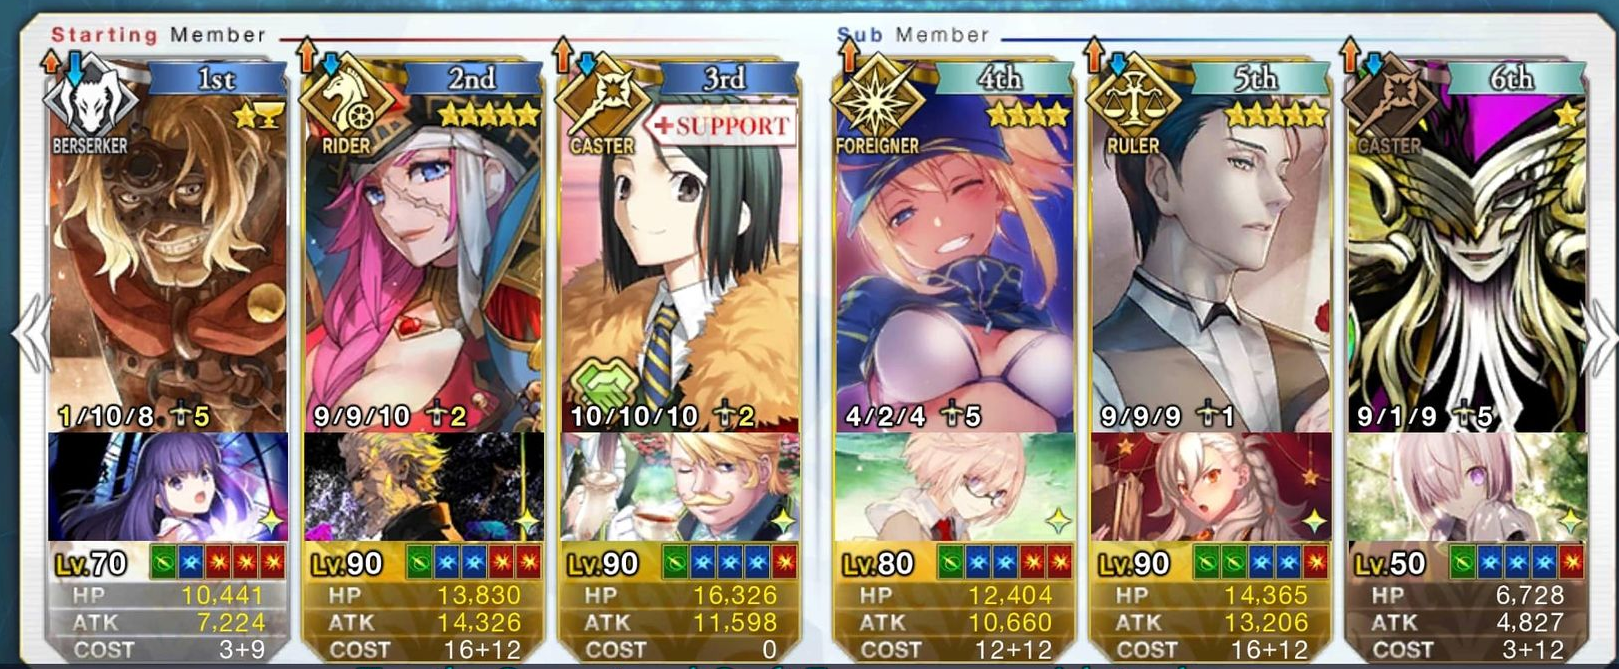
Turn by turn breakdown:
| Turn | Actions | NP |
|---|---|---|
| 1 | Spartacus skills 2 + 3 | Spartacus |
| 2 | Drake | |
| 3 | Drake skills 1 + 3, Waver skills 2 + 3, Waver skill 1 on Drake | Drake |
Sample team (5 slot):
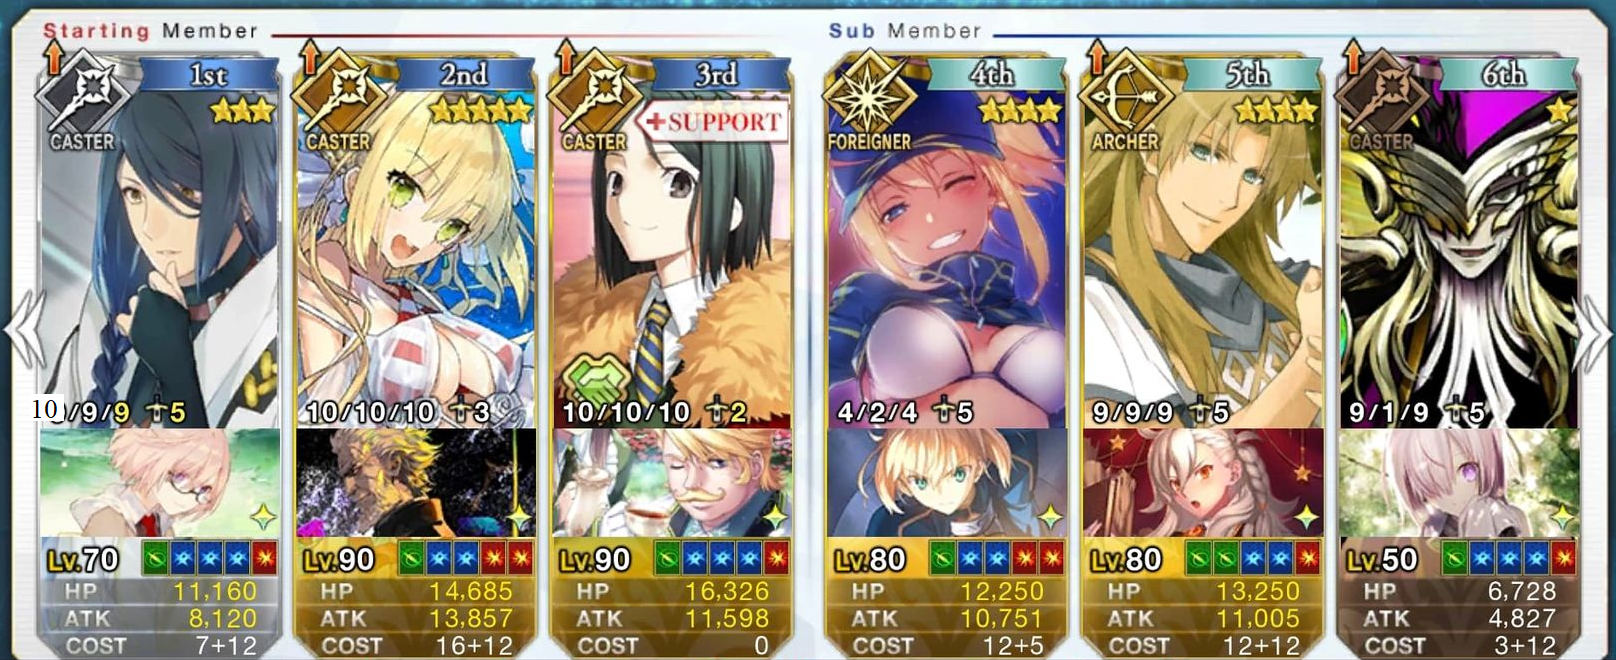
You get the idea.
The following is a list of servants with 50% or higher batteries that can easily double NP with superscope:
| Servant | Class | NP Type | Battery |
|---|---|---|---|
| Ishtar | Archer | AoE | 50% |
| Tesla | Archer | AoE | 50% |
| Archer of Shinjuku | Archer | ST | 50% |
| Chloe von Einzbern | Archer | ST | 50% |
| Tristan | Archer | ST | 50% |
| Billy the Kid | Archer | ST | 50% |
| Altria Pendragon | Lancer | AoE | 50% |
| Ereshkigal | Lancer | AoE | 50% |
| Nitocris | Caster | AoE | 100%+ |
| Paracelsus | Caster | AoE | 80% |
| Avicebron | Caster | AoE | 80% |
| Anastasia | Caster | AoE | 50% |
| Nero Claudius (Caster) | Caster | AoE | 50% |
| Leonardo Da Vinci | Caster | AoE | 50% |
| Medea | Caster | ST | 100%+ |
| Circe | Caster | ST | 100%+ |
| Xuanzang Sanzang | Caster | ST | 80% |
| Francis Drake | Rider | AoE | 50% |
| Astolfo | Rider | AoE | 50% |
| Sakata Kintoki | Rider | ST | 50% |
| Kama | Assassin | ST | 50% |
| Sakata Kintoki | Berserker | ST | 50% |
| Sessyoin Kiara | Alter-Ego | AoE | 50% |
| Space Ishtar | Avenger | AoE | 50% |
| BB (Summer) | Moon Cancer | AoE | 50% |
| Sessyoin Kiara (Summer) | Moon Cancer | AoE | 50% |
| Voyager | Foreigner | AoE | 50% |
| Abigail Williams (Summer) | Foreigner | AoE | 50% |
- Having a superscope is a requirement for most practical XSS teams. While many players view XSS as the ultimate farming setup due to its slot efficiency (5 slots) and versatility (many XSS loopers are class agnostic), it is actually preferable that XSS be avoided whenever possible.
XSS, or why Skadi is high maintenance
While many players with superscopes and the necessary components to run XSS may feel inclined to use it at every given opportunity the truth is that, in many scenarios, XSS is not the most efficient setup in terms of both time and effort.
The first thing to note is that XSS is not low effort. Using Skadi in an XSS setup not only requires more clicks than Waver (5 to 4), but is also more prone to misclicks due to two of her skills being targeted. As XSS loopers are dependent on the quick buffs and NP charge from Skadi, the penalty for misclicking is often a completely botched run, which most players rectify through the use of a command seal.
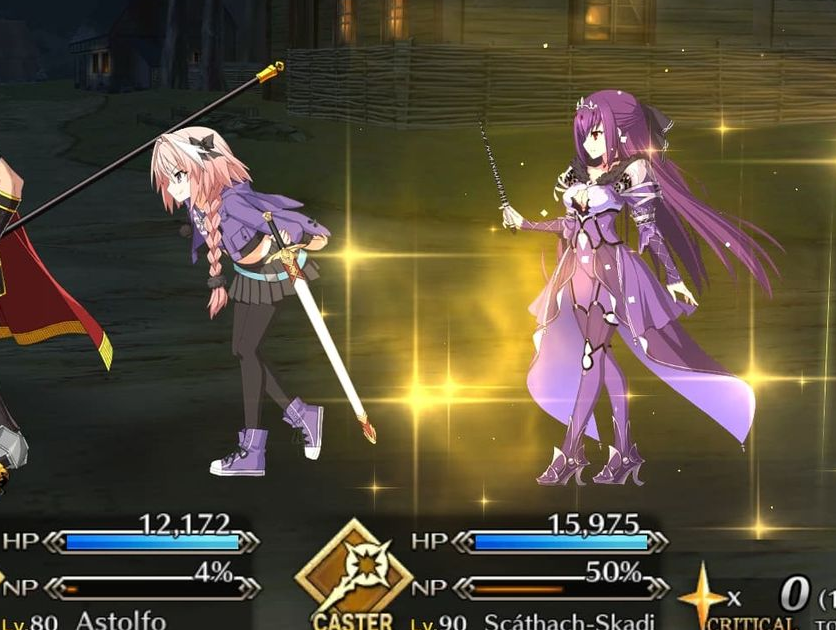
In order to get a better idea of the effort required to run XSS, we list the following XSS compatible loopers and the clicks required for any necessary self buffs or skills.
| Servant | Clicks | Notes |
|---|---|---|
| Parvati | 2 (if skill 2 is needed on wave 3) | Skill 3 is usually not needed |
| Valkyrie | 2 | Skill 3 takes up time at the end of every turn |
| Atalante | 2 | |
| Achilles | 2 | Requires 2004 (3 / 6 clicks) or Mage's Assocation MC (3 clicks) |
| Marie Antoinette | 1 | |
| Lancelot (Berserker) | 1 | Requires 2004 MC (3 / 6 clicks) |
| Dantes | 2 (if skill 1 is needed on wave 3) | |
| Voyager | 2 | Might require 2004 (3 / 6 clicks) or Mage's Assocation MC (3 clicks) |
For a full list of XSS calculations: XSS Superscope Plugless Farming Handbook by Zwei
The XSS setup with the least possible number of clicks uses Marie, no defense downs from Skadi, and no MC skills. This comes out to a total of 21 clicks (12 (4 / turn) + 1 (teamwide buff) + 8 (4/ Skadi)). Using Skadi's defense downs brings the total up to 23 clicks.
Lancelot, despite being a popular choice for XSS, actually requires some of the most clicks. A typical XSS run with Lancelot requires (12 (4 / turn) + 1 (skill 3) + 10 (5 / Skadi) + 6 (2004 MC)) = 27 clicks. This is not an insignificant number of clicks by any means. Not only is 27 clicks high effort, it also means the run itself takes longer due to the number of skills that need to be used.
That being said, it is possible to maintain slot efficiency while not suffering from the high click counts and effort required for XSS teams.
Skadi isn't invited to New York
For Gilfest specifically, it is entirely possible to XSS all 3 rotations with 5 slots of bonus and some RNG. Dantes is a standout in this regard, as he has flexibility in his choice of MC at higher NP levels (NP3+ especially). However, a consistent Dantes team for Gilfest will require (12 (4 / turn) + 2 (skills 1 and 2) + 10 (5 / Skadi) + 2-3 (depending on what MC is being used)) = 26-27 clicks and 4-5 targeted buffs being used.
However, due to XSS being neither low effort nor time efficient for the reasons listed above, it would be ideal if we could find team compositions that have at least the same slot efficiency while either taking less time and effort or having more leeway for errors.
The following are examples of team compositions that meet this criteria:
Rotation 1 (5 slots, 23 clicks, 2 targeted buffs) :
Mystic Code: A Fragment of 2004
| Turn | Actions | NP | Clicks |
|---|---|---|---|
| 1 | Artoria skill 1, Nitocris skill 2 | Nitocris | 6 |
| 2 | Artoria | 4 | |
| 3 | Artoria skills 2 + 3, Waver skills 2 + 3, Waver skill 1 on Artoria, MC skill 1 on Artoria | Artoria | 13 |
Mordred can also replace Artoria here, albeit at the cost of lower damage.
Rotation 2 (5 slots, 26 clicks, 4 targeted buffs):
Mystic Code: Tropical Summer
| Turn | Actions | NP | Clicks |
|---|---|---|---|
| 1 | Both Wavers skill 3, Paracelsus skill 3 on self, Paracelsus skill 2 | No NP, just facecard | 9 |
| 2 | Paracelsus skill 1 | Paracelsus | 5 |
| 3 | Both Wavers skill 1 on Paracelsus, Waver skill 2, MC skill 1 | Paracelsus | 12 |
Although this setup has a similar number of clicks and targeted buffs as an XSS setup, it is more forgiving because one Waver's skill 2 can be used to fill any missing NP gauge if the player misclicks or gets bad RNG.
Rotation 3 (6 slots, 29 clicks, 4 targeted buffs):
Mystic Code: Tropical Summer
| Turn | Actions | NP | Clicks |
|---|---|---|---|
| 1 | Waver skills 2 + 3, Waver skill 1 on Jarcher, Jarcher skills 1 + 3, Paracelsuss skills 1 + 2, Paracelsus skill 3 on Jarcher, MC skill 3 on Jarcher | Paracelsus | 17 |
| 2 | Jarcher | 4 | |
| 3 | Jarcher skill 1, MC skill 1 on Jarcher | Jarcher | 8 |
Unlike the previous two sample teams, this rotation 3 team actually requires more clicks than an XSS setup and has moderate wave 1 / wave 3 RNG due to it requiring Jarcher to build up 20% NP charge through arts chaining / facecards on wave 1 and requiring Jarcher facecards on wave 3. However, this is in return for being more slot efficient while still having only 4 targeted buffs.
However, if one was to value consistency over potentially using less effort, it would be simple to use the plugsuit MC and include another buffer / source of battery such as Waver in order to entirely remove the RNG in waves 1 and 3.

2+ Superscopes
The obvious setup that comes to mind when thinking of multiple superscopes is a triple superscope setup that can clear a 3 wave node in around 12 clicks. Although this method of clearing nodes is the most time efficient by far (3 waves, 3 NPs, 12 clicks barring any additional buffs), it is one of the worst setups for slot efficiency as there are only 3 slots left over for other CEs. For players who don't care for servant bond, master level, and MC level, this setup works fine as it requires minimal effort for a minturn clear. But as most players do care about the aforementioned things to some extent, the triple superscope setup can be considered impractical, a "lazy man's team" in a sense.
- Double superscope setups can run more flexible variants of the 4 slot comps described in the 1 superscope section due to the third servant not requiring any charge of their own. This third servant can improve the consistency of a farming setup if they can provide buffs to the wave 3 clearer while also being able to clear a wave on their own.
- Another benefit of this setup is that the 2k attack from a superscope greatly boosts the damage of lower rarity servants by a not insignificant amount. For example, Caster Gilles' NP damage with class advantage goes from an average of 23,330 to 29,540 with superscope equipped and no additional buffs. This is a 26.6%~ increase in damage from the CE attack stat alone. This, combined with the relatively fast NP animations of many lower rarity servants, makes Gilles and other low rarity servants more enticing options when constructing farming setups.
- Because the third servant in the frontline does not require any additional charge, a player with double superscopes should consider bringing Skadi instead of Waver to nodes where the third servant does not require any attack buffs to clear their wave. This is because Skadi can provide your double NPing servant with 50% battery in 2 clicks, compared to Waver's 4 clicks. In addition to this, the servant that is using their NP twice does not necessarily need to be a quick servant, as Skadi can provide a 30% defense down on enemies in the last wave, which is functionally the same as Waver's 30% attack buff. The takeaway is that if Waver provided enough buffs for your wave 3 servant to consistently clear the wave, it is better to take Skadi as she can provide the same buff, but with 1 less click (assuming her quick buff is not used).
Sample teams (4 slot):
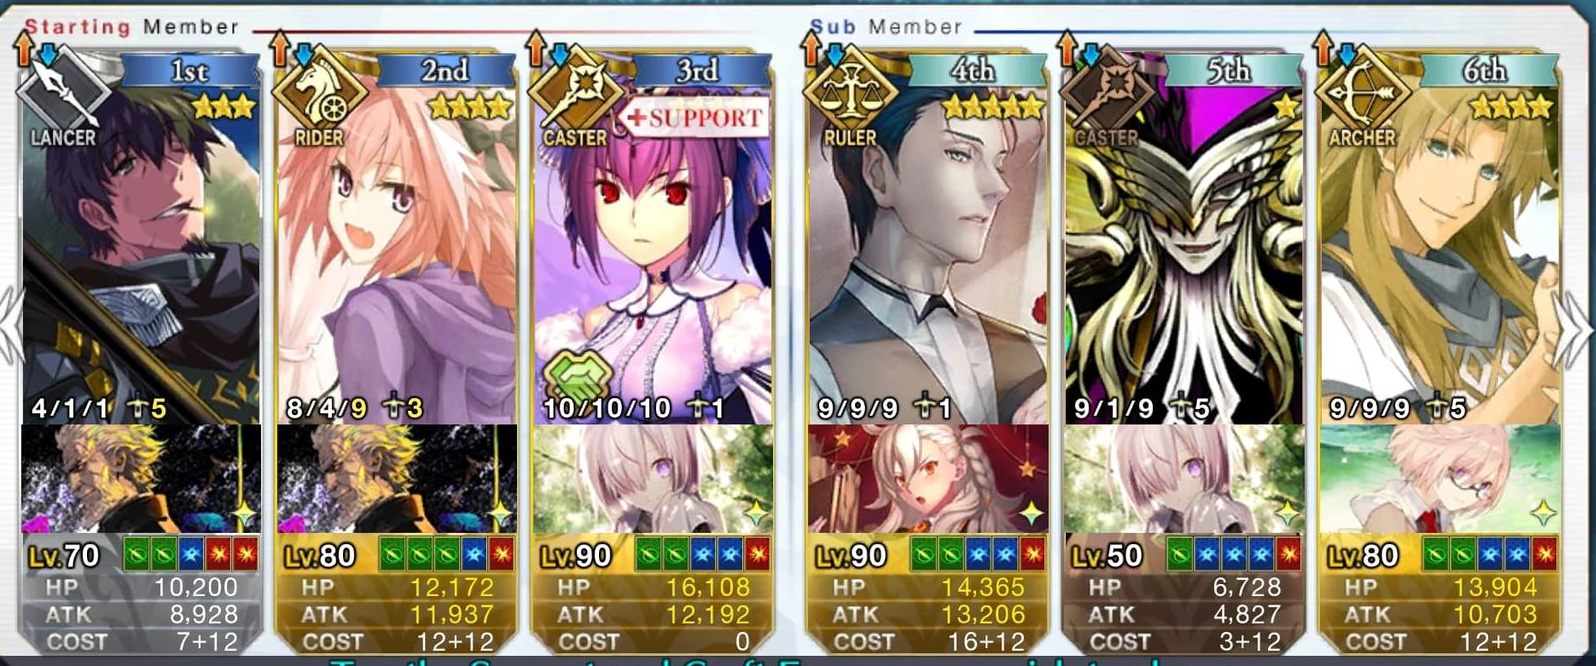
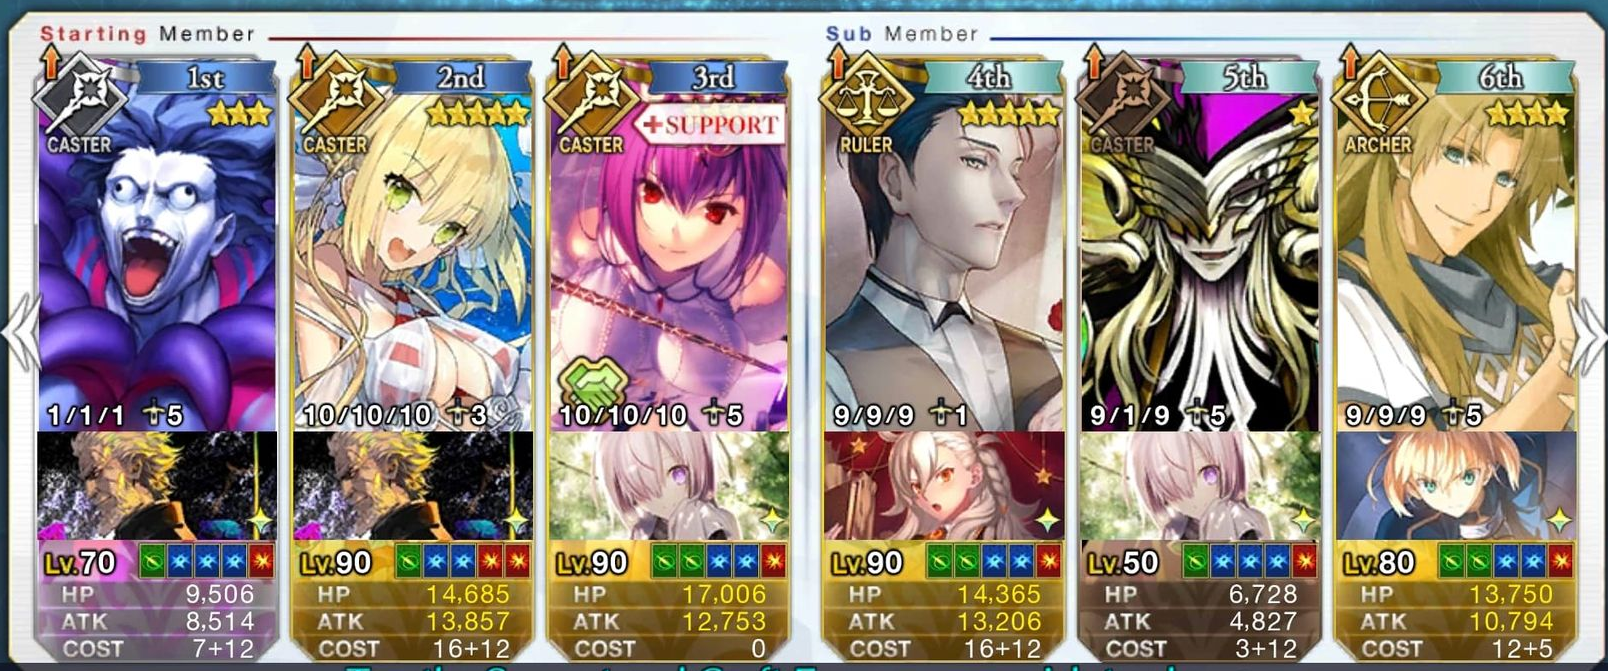
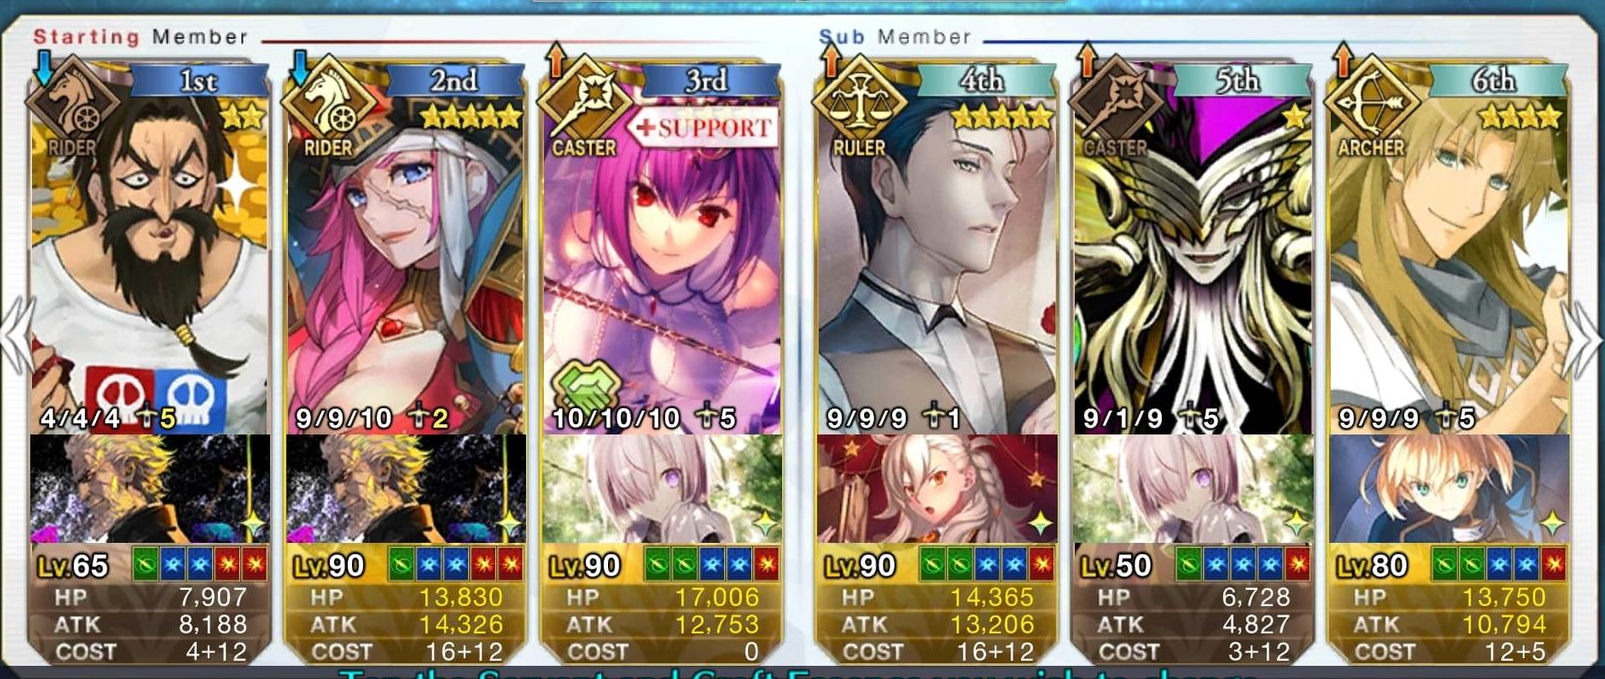
An interesting variant of this setup uses Ereshkigal:
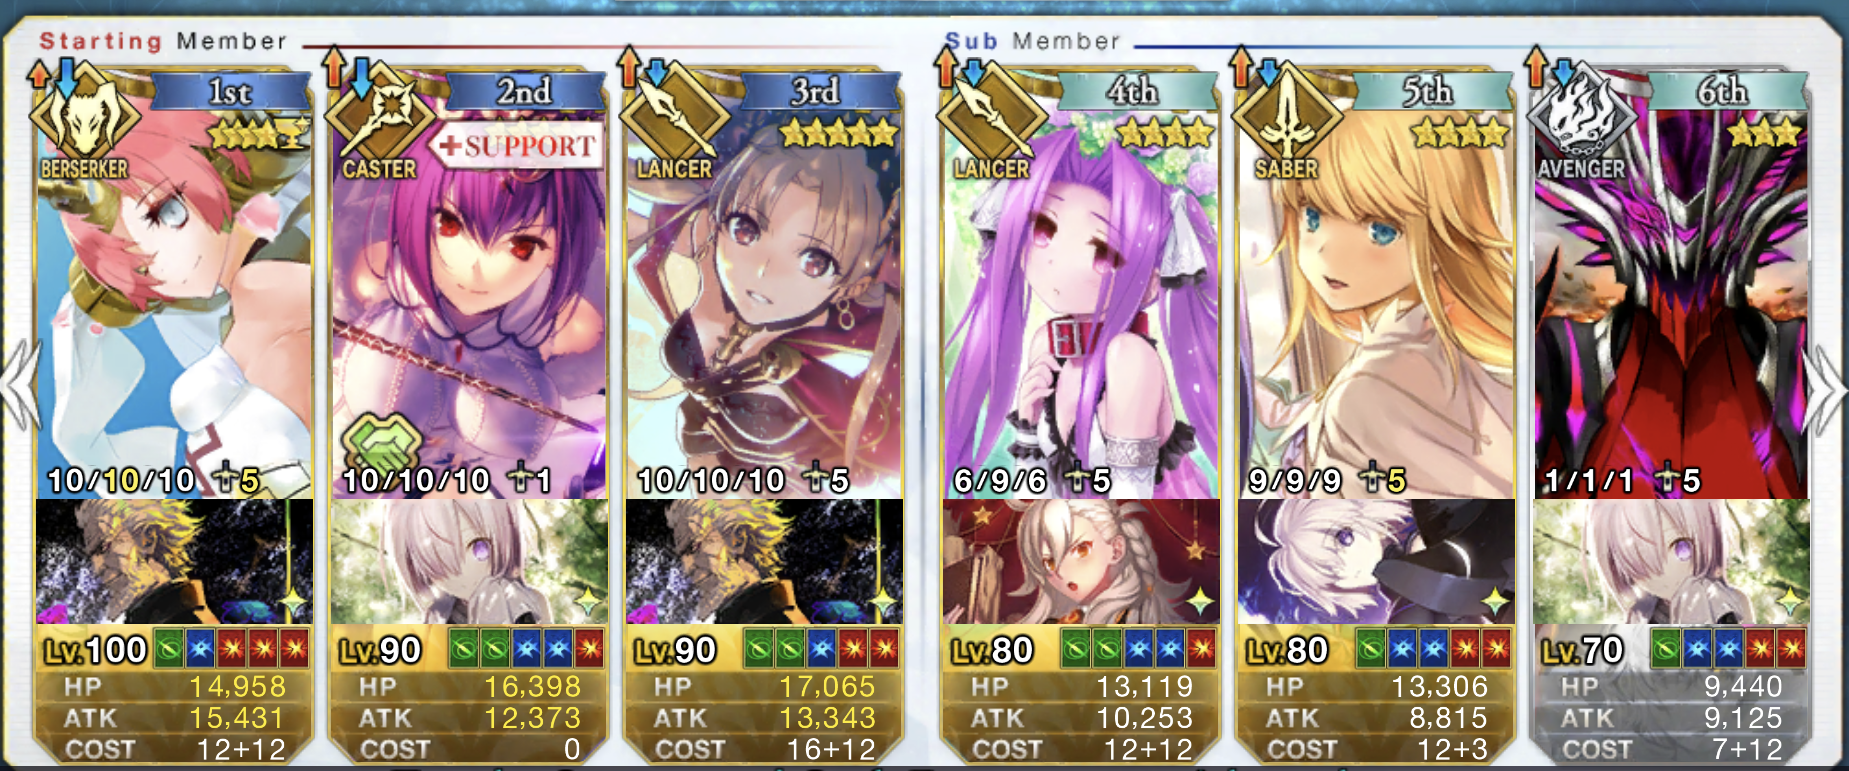
Whereas the previous setups had the servant NPing twice do so on waves 2 and 3, the Ereshkigal setup has her NP on waves 1 and 2 to provide a 40% attack buff for the third servant on wave 3. This is because any servants who receive the teamwide buff from her third skill have their attack increased for 3 turns every time Ereshkigal uses her NP while the buff is active.
Final Thoughts
Although most players might consider farming in FGO to be a fairly straightforward affair, there is a surprising amount of optimization that can be done to improve the efficiency of any given setup. However, it is important to take a holistic approach to optimization and the game in general.
Some things to keep in mind:
- Time efficiency should not be a major consideration if the player is using only natural AP / limited in their refills. If this is the case, there is nothing lost by using servants who have longer NP animations, as using servants with shorter animations would not somehow allow the player to farm more. This also applies to how much effort a setup requires, as high effort setups are not an issue for players who are not planning on using them extensively for long periods of time.
- Slot efficiency is not super important outside of events, where event CEs can provide bonuses to event currency and drops. Although it is nice to free up an extra slot for a bond or mystic code CE, this should not be a priority for players who are low on resources and need to use higher effort setups with lower slot efficiency.
- While looping is the "trendy" thing to do with XSS in FGO Global and Caster Artoria in FGO JP, one must consider the actual trade-offs that are being made when utilizing these setups - Castoria setups have a minimum of 22 clicks, not low effort by any means.
- One must consider context when farming. For example, if a player is farming while doing other things such as watching TV or reading a book, it may be better for them to go with less slot efficient but more streamlined setups in order to reduce the risk of botching a run due to misclicked skills while not paying attention. There are always trade-offs that have to be made.
The hope is that anyone who reads this article is able to apply the given optimizations in order to improve their gameplay and have a better experience playing FGO.

All videos and images included belong to their respective publishers.
All images, unless otherwise noted, are official Fate Grand Order game assets.


